iCaddy Step-by-Step
Build Guide

Want to build an App for your Club, but have no App building experience? No problem - the iCaddy Apps build framework makes it easy to build your own App. If you can rename and resize an image file using standard image editing software, you'll be able to build and publish your App in no time at all - just follow the steps outlined below.
Step 1 - Setup an Account.
Click on this link to Start a 30-Day Free Trial NOW!
Step 2 - Select a Template and Name Your App.
For this tutorial you will select one of the three 'iCaddy' template versions on the first page of the templates list.
Each App template in the iCaddy range (iCaddy+, iCaddy HD, iCaddy Pro etc.) has three different versions available (Lite, Standard and Eagle).
'Lite' versions have limited menu functionality and do not include 'Pro Tips' pages. Lite versions allow for a fast & easy setup that you can upgrade later if required.
'Standard' versions have full funtionality including 'Pro Tips' for each hole.
'Eagle' versions include all the funtionality of 'Standard' versions and also include special links to your clubs 'hole-flyover' videos.
For information on how to select and name a template, go to How to Select a Template.
Note: You must have at least one App under development (i.e. listed in your 'My Applications' list) in order to activate your account after paying for a subscription plan.
Step 3 - How to Start Editing Your App.
The information provided below will take you through the steps to begin editing your App's content.
For information on how to start editing your App, go to How to Start Editing Your App.
Note: The steps indicated below can be performed in any order. All the functions available throughout the iCaddy range represent discrete (individual) features. All features are optional and any feature can be removed if preferred.
Step 4 - Select a Color Scheme.
You can choose any color to use for your App's buttons and background to suit your Club's existing marketing profile.
For information on how to select button colors go to How to Edit a Button (Steps 1 to 4). Take note of the color reference code for the color you select (e.g. #000000) and enter this code into each Menu (Button) page in your App. The How to Edit a Button tutorial provides information on where to enter this code. For information on how to change the color of the background go to How to Change the Background. Take note of the color reference code for the color you select (e.g. #FFFFFF) and enter this code in the background settings for each page in your App. The How to Change the Background tutorial provides information on where to enter this code.
Step 5 - Add Your Club's Logo.
Before you can add your Club's logo to your App, you need to upload the logo (image file) to your App's resources. For information on how to upload a file into your App's resources, go to How to Add a File to Your App's Resources.
Once you have uploaded your Club's logo, you can add the logo to each page in the App as required. For information on how to add the logo to a page, go to How to Add Your Club's Logo to a Page in Your App.Before you can add your Club's logo to your App, you need to upload the logo (image file) to your App's resources. For information on how to upload a file into your App's resources, go to How to Add a File to Your App's Resources.
Repeat this proccess on every page that contains the existing iCaddy logo by replacing it with your Club's logo.
Note: All files uploaded must be named using only letters, numbers and underscores, without spaces - for example (File_Name_3.png).
Step 6 - Add Your Club's Store Icons, Multimedia & Store Description.
Club's need to supply icons (which will be used for your App in the App Stores), and Splash Pages (which appear when the App is first opened on a device) and also a Description for your App. The description provided will advertise your App online and be displayed at the Google Play Store and the Apple App Store.
For information on how to add 'App Store' images and a description for your App, go to How to Edit 'App Store' Properties & Multimedia.
For information on how to add 'Play Store' images and a description for your App, go to How to Edit 'Play Store' Properties & Multimedia.
Step 7 - Add Your Club's Hole Map Images.
For information on how to add your Club's hole map images to your App, go to How to Edit Hole Map Images.
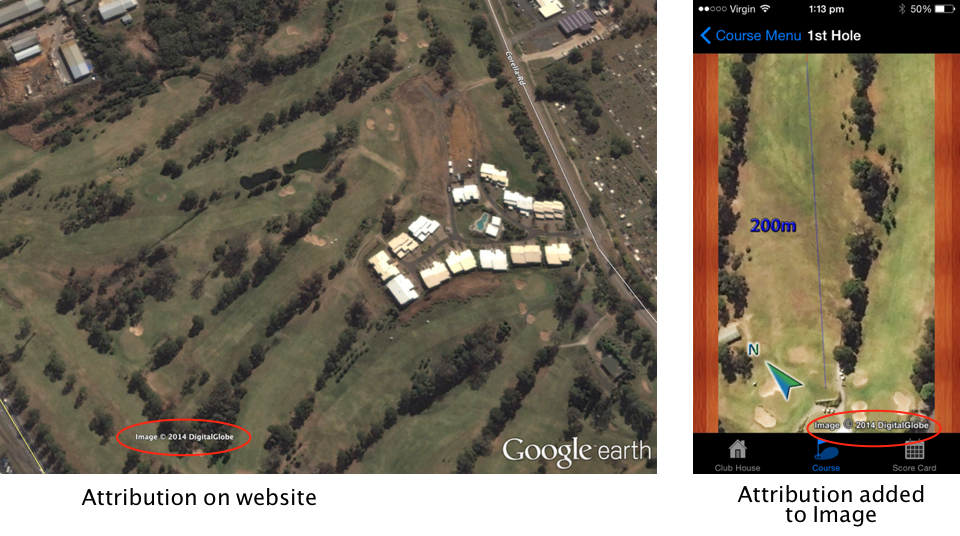
Note: You can use any type of image as a hole map, including satellite images, aerial photography, graphic depictions or cartoon images - it is totally up to you, however all satellite images sourced from Google Earth or Google Maps must include the attribution found on the image when copied. See the example below.
Step 8 - Add Your Club's Hole Sponsorship Images.
For information on how to add your Club's hole sponsorship images (advertisements) to your App, go to How to Edit Hole Sponsorship Images.
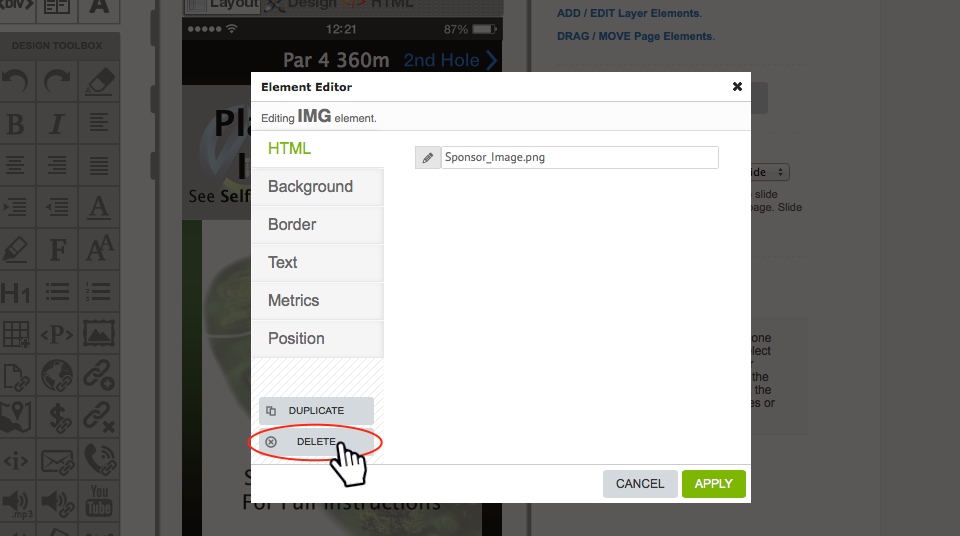
If your Club does not wish to include hole sponsorship or advertising in your App, no problem - just follow Steps 1 and 2 in the How to Edit Hole Sponsorship Images tutorial and then click 'DELETE' in the Element Editor as shown in the image below.
Click 'APPLY' then click 'Save'.
Step 9 - Edit Hole Information.
Each hole map page has a banner at the top with hole distance and par information for each hole.
For Information on how to edit hole information, go to How to Edit Hole Information.
Step 10 - Edit Score Card Information.
Each iCaddy App template includes two (2) 'two-player' scorecards that can be edited to contain your Club's scorecard information. You can also change the background and text color for the score card info as required.
For information on how to edit score card information, go to How to Edit Score Card Info.
Step 11 - Add Course Map Image.
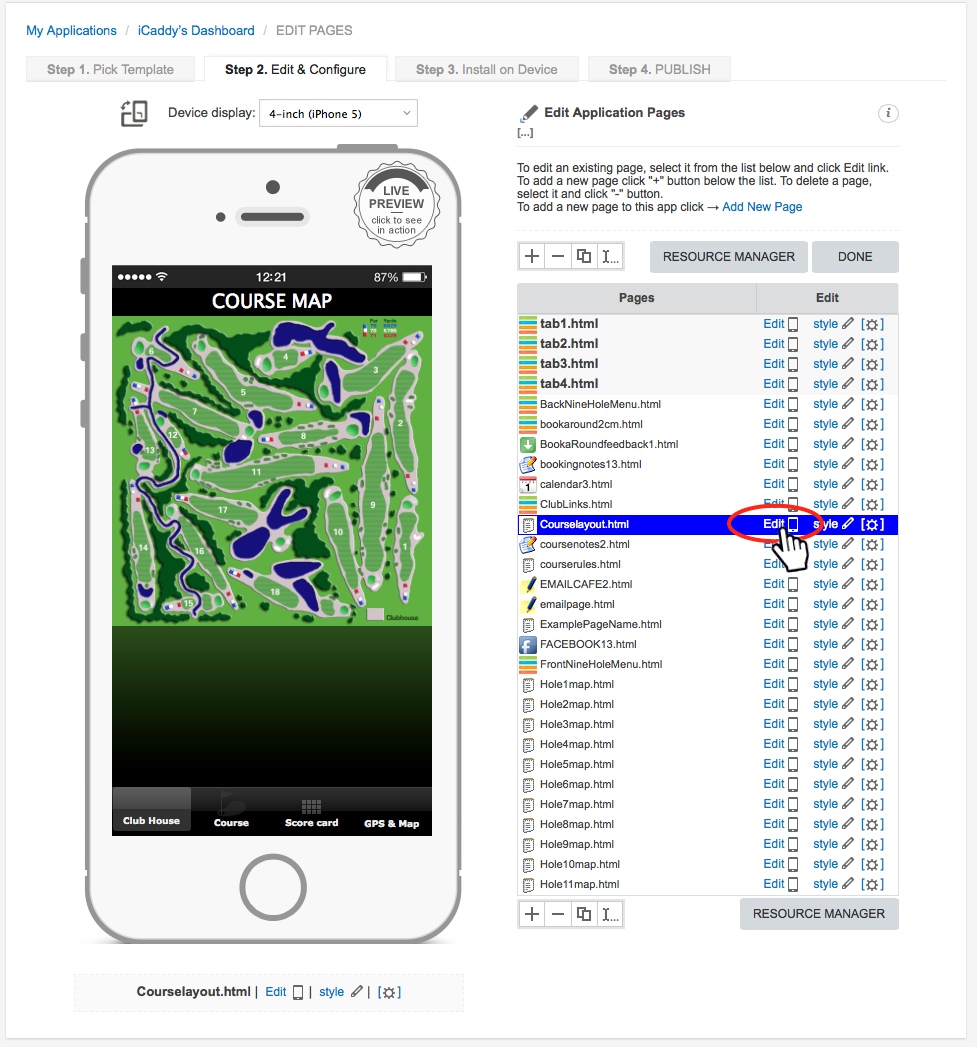
To add a Course Map image, go to the 'CourseLayout' page and select 'EDIT' (as shown below), then follow the same procedure used to add a hole map.
For information on how to add a hole map, go to How to Edit Hole Map Images.
Step 12 - Edit Pro Tips.
Pro Tips (player guidance information) can be added for each hole. You can add audio files, or display the information in text, or use both options. Just follow the steps in the tutorial below.
For information on how to edit Pro Tips, go to How to Edit Pro Tips.
For information on how to use audio recordings, go to How to Add an Audio File.
Note: Pro Tips are not included in 'iCaddy Lite'.
Step 13 - Edit GPS Link.
The GPS link available in iCaddy provides an indication of the player's location on course to help guide club selection and play, however it does not provide players with accurate distances from the pin or wind direction information. This arrangement is in the spirit of the game and ensures that the functions available in iCaddy Apps do not contravene the rules of golf.
Feedback received from Golf Clubs indicates that Apps should not provide players with features which are inconsistent with the spirit of the game. If however, you would like to include extra GPS distance (and other) features in your App, the iCaddy Apps Build Team can incorporate special features on request.For information on how to edit the GPS link go to How to Edit the GPS Link.
Step 14 - Edit Calendar Information.
Clubs can add items to the calendar to remind players of up coming events.
For information on how to edit Calendar Information, go to How to Edit Calendar Information.
Step 15 - Edit Booking Page Links.
The Booking Page contains buttons (links) to allow players to book a round at your Club via various methods (i.e. telephone, Booking Form, or direct email).
The first thing to edit on the Booking page is the telephone link for the Pro Shop. For information on how to edit telephone links, go to How to Edit Telephone Links.
To use the default Booking Form provided in an iCaddy template, simply edit the the form's destination email address and insert your Club's logo into the form. Note that the booking will be sent via email to your Club. The Booking Form can be customized by editing any (or all) the fields provided on the form (as required to suit your Club and it's facilities). For information on how to edit the Booking Form, go to How to Edit the Booking Form.
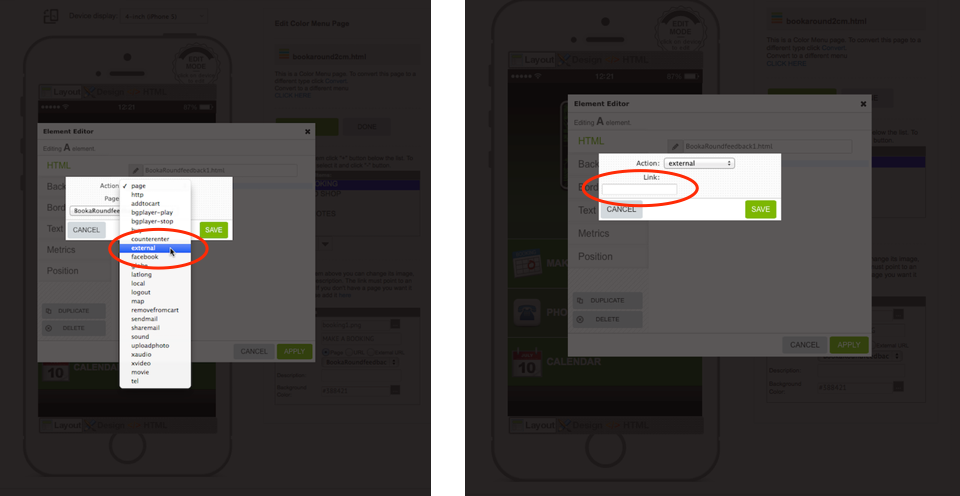
Club's with existing websites that incorporate a live online booking facility can link the Booking Form button (in the App) to your Club's website (via an external link function). Note that the Club's website (and online booking facility) must be configured for use on mobile devices for this function to work. For information on how add an external link, go to How to Use the Element Editor, select 'external' from the drop-down list and then add the URL to the 'Link' cell (as shown below).
Bookings can also be made via direct email to your Club (i.e. not via the Booking Form) by editing an existing button on the Booking Page. Alternatively, you can create another button on the Booking Page to provide this feature additionally. The direct email function will utilise the default email program on the player's mobile device.
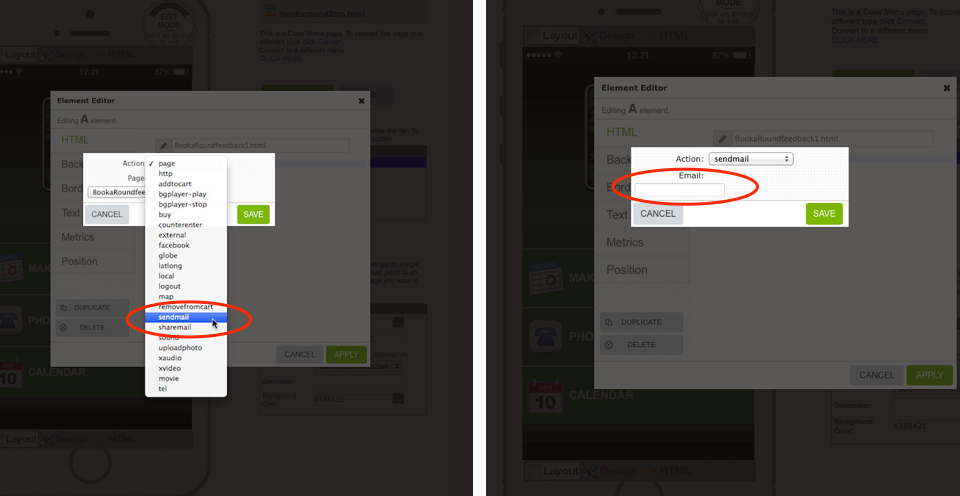
To enable this feature, use the Element Editor to change the link type (e.g. an external link as shown above) to an email link by selecting 'sendmail' from the drop-down list and then adding the required destination email address to the 'Email' cell (as shown below).
Step 16 - Edit Drinks Cart Link.
You can use SMS, telephone or email to connect players to the Drinks Cart service.
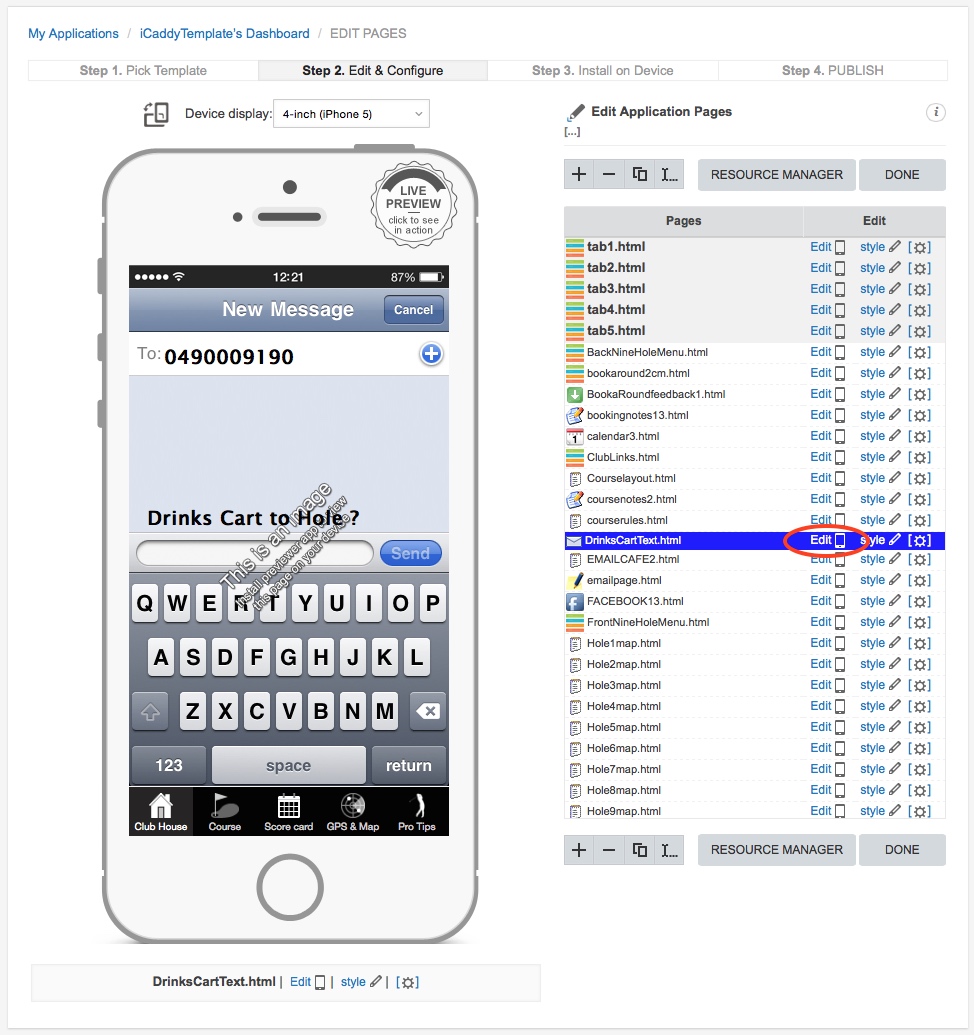
SMS is set by default and only requires you to edit the preferred destination telephone number. To do this, edit the 'DrinksCartText.html' page by clicking 'Edit' (as shown below).
For information on how to edit the Drinks Cart SMS page, go to How to Edit a Text Message Link.
You can also change the default SMS link to a telephone link to allow players to contact the Drinks Cart via telephone call.
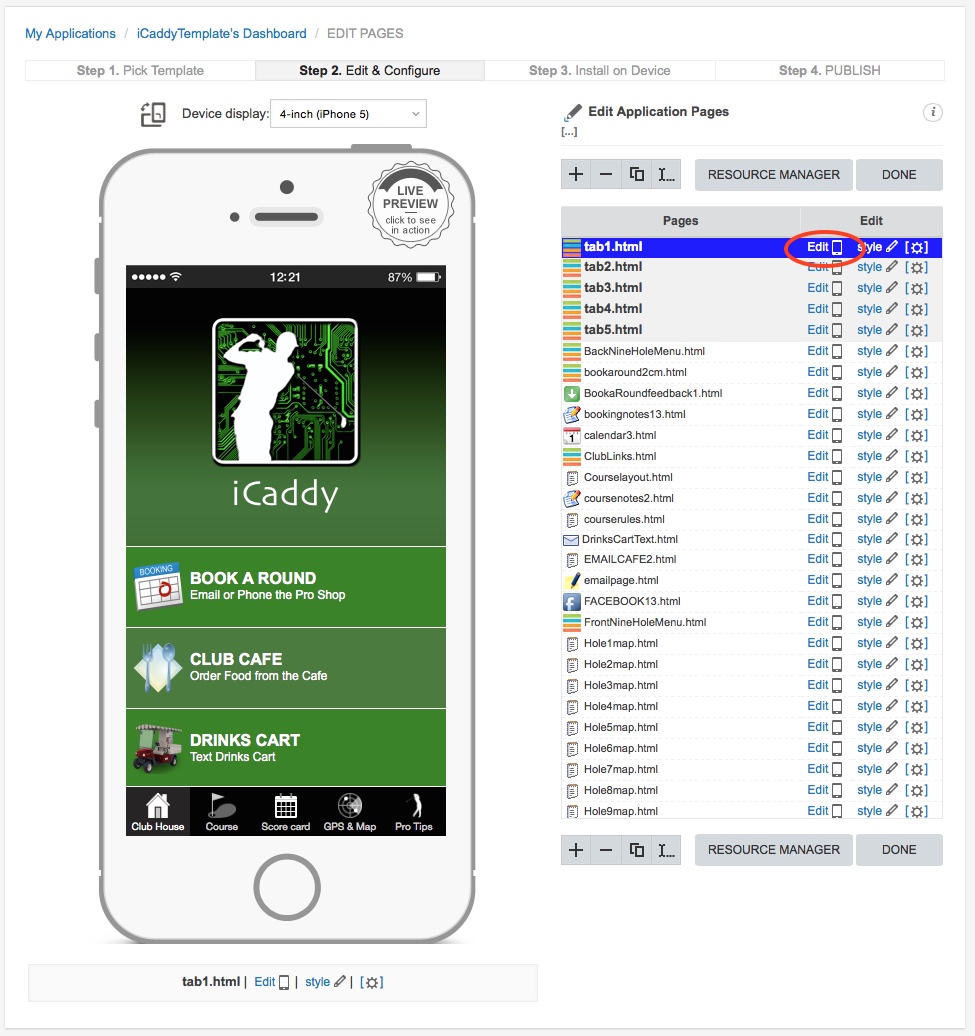
This is done by editing the link associated with the drinks cart button on 'tab 1'. Select 'tab1.html' from the page list (highlighted in blue below). Click 'Edit' (as shown in the image below) to open 'tab1.html' for editing.
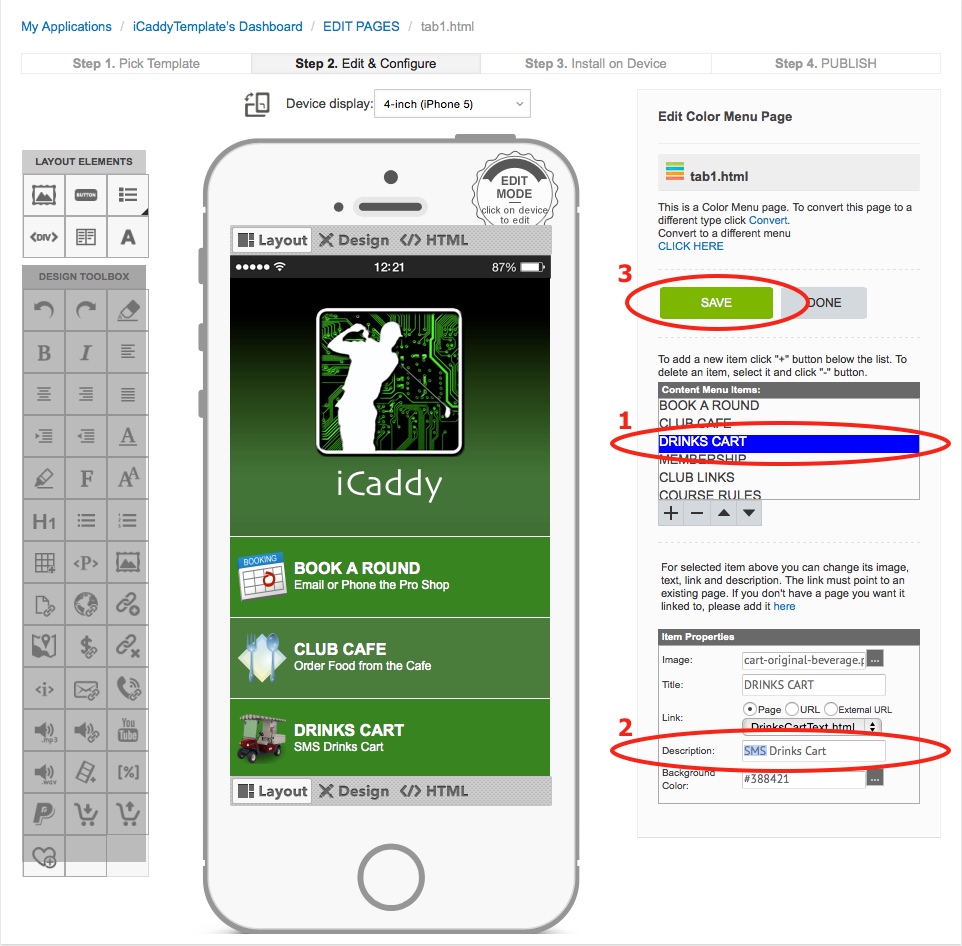
The first step is to change the text that appears on the 'Drink Cart' button. Select 'Drinks Cart' in the 'Content Menu Items' list (per (1) below), then edit in the 'Description' field in the 'Item Properties' section (2). Change the text from 'SMS Drinks Cart' (default) to 'Phone Drinks Cart', or 'Call Drinks Cart' etc. Click 'SAVE' (3).
The next step is the change the link from an SMS link to a telephone link. Click on 'Layout' on the 'Handset Display' to enter 'Layout Mode' (per (1) below). Click on the 'Drinks Cart' button on the 'Handset Display' (2). The 'Element Editor' will open. Select the 'HTML' tab on the left of the Element Editor (3). Click on the 'pencil' icon to open the 'Action' dialogue box (4), then click anywhere in the 'Action' field to open the drop-down list (5). 'Select 'tel' from the drop-down list (6). Enter the destination telephone number in the 'Phone' field (which appears after selecting the 'tel' option) (7). Click 'SAVE' (8). The dialogue box will close. Click 'APPLY' in the Element Editor (9) to return to the 'Edit Pages' screen for 'tab1.html'. Click 'SAVE' (10). Following these steps will facilitate contact to your nominated telephone number when the Drinks Cart button is tapped on the App. For more information on how to edit a telephone link, go to How to Edit a Telephone Link.
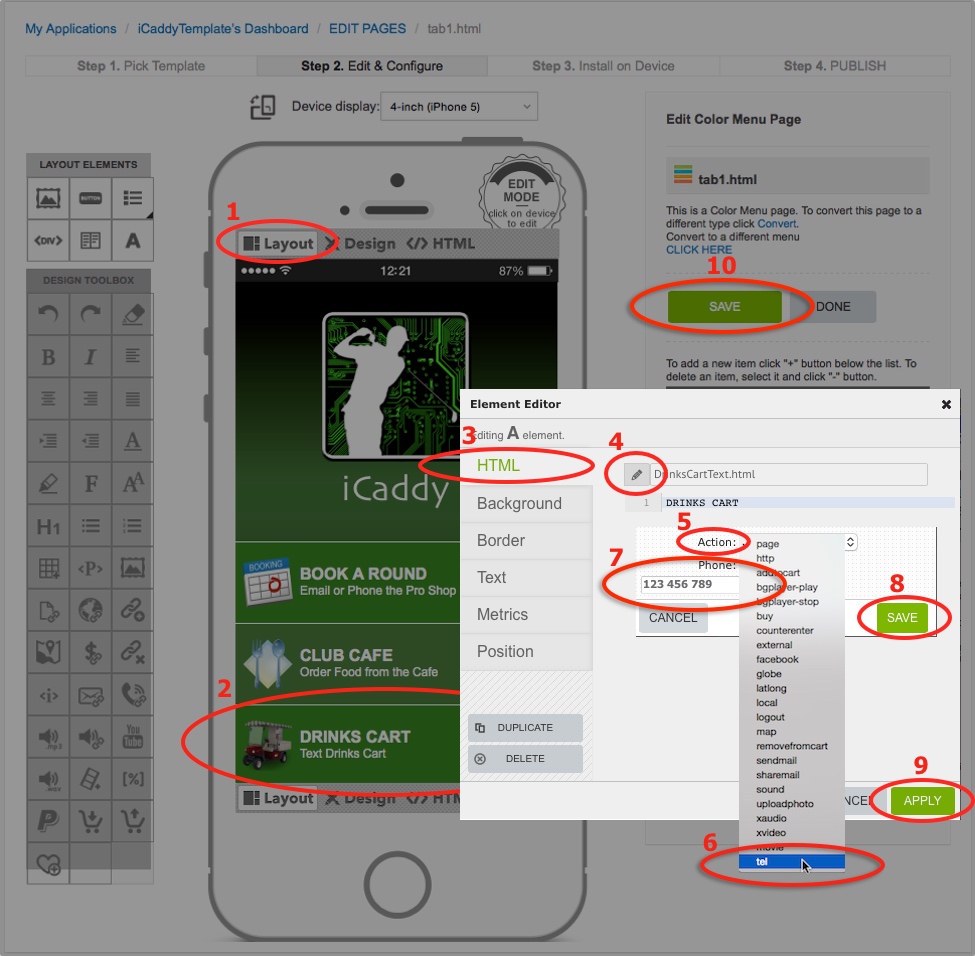
Note: After changing the link (from an SMS link to telephone link) using the Element Editor as described above, the 'Link to Page' setting shown in the 'Item Properties' for the 'Drinks Cart' button, no longer applies. The previous 'Page' link (to the 'SMSPage.html' page) remains displayed, however this setting no longer reflects the true function of the button - the settings established via the Element Editor have 'overwritten' this property. Leave this setting unchanged, as it does not affect the functionality of the 'Drinks Cart' button (once the link has been changed to a 'tel' link per above). Note that any subsequent changes applied using the 'Item Properties' for the page (if saved) will override the previous 'tel' link setting in the Element Editor.
Step 17 - Edit Food Menu & Order Links.
The food order page (PLACEORDERMENU2.html) contains the restaurant / bistro menu for your Club and a link to place an order. The Club's menu can be added as a single image. The menu image is added the same way as a hole map image is added. For information on how to add an image, go to How to Edit Hole Map Images.
The link to place an order can be via telephone or SMS. A telephone link ('tel') is set by default and only requires you to edit the destination telephone number that you wish to use. For information on how to edit the Phone Order button, go to How to Edit Phone links. You can also change the link from a telephone link to an SMS link if preferred. Navigate to the relevant page (PLACEORDERMENU2.html) and click on the 'Phone Order' button on the handset display. The Element Editor will open. Select the 'HTML' tab on the left hand side of the Element Editor. Click on the 'pencil' icon to open the 'Action' dialogue box. Click anywhere in the 'Action' field to open the drop-down list. Select 'page' from the drop-down list, then in the 'Page Field', select the page called 'TEXTORDER2.html'. Click 'SAVE', then click 'APPLY' in the Element Editor. You have now changed the button link from a telephone link to an SMS link. For more information on how to edit a SMS link, go to How to Edit an SMS Link.Step 18 - Edit Club Contact Links.
The Club Links page (ClubLinks.html) contains the contact information for your Club including links to social media sites.
There are two links that are edited directly from the 'ClubLinks' page - the telephone link and the map link. For information on how to edit the telephone link, go to How to Edit Telephone Links. For information on how to edit the Map link, go to How to Edit GPS Links.
The four other links on the 'Club Links' page are edited via their individual pages. The Facebook, Twitter, Email and Website links require the correct address information to be entered (i.e. email address or URL) on the relevant App pages to enable these features. If your Club does not wish to include any of these features in your App, you can delete any of these pages (and linked buttons) as preferred.
For information on how to edit button links, go to How to Use the Element Editor.
Step 19 - Edit Notice Board.
The Noticeboard button on 'tab1' is linked (by default) to a page called 'NoticeBoard1'. This page can be edited (and updated) directly via the 'Design' mode on the handset display (the same way you edit Pro Tips as described in Step 12 above). For information on how to edit this type of page, go to How to Edit Pro Tips.
Alternatively, if you have live Notice Board on your Club's website, you can link the Notice Board button on 'tab1' directly to the relevant web page (URL). For information on how to add a web link to this button, go to How to Use the Element Editor.
Step 20 - Edit Membership Page.
The Membership page (Membershiptwo.html) contains membership details for your Club.
The Club's membership information can be added as an image. The membership image is added the same way as a hole map image is added. For information on how to add an image, go to How to Edit Hole Map Images.
Alternatively, you can link the Membership button on 'tab1' directly to the membership information on your Club's website. For information on how to add a web link to this button, go to How to Use the Element Editor.
Step 21 - Edit Course Rules Page.
The Course Rules page (courserules.html) contains the course rules for your Club.
The course rules can be added as an image. The course rules image is added the same way as a hole map image is added. For information on how to add an image, go to How to Edit Hole Map Images.
Alternatively, you can link the course rules button on 'tab1' directly to the course rules page on your Club' website. For information on how to add a web link to this button, go to How to Use the Element Editor.
Step 22 - How to Add Hole Flyover Videos to Your App.
If you have selected the iCaddy 'Eagle' version in order to include hole fly-over videos in your App, the last step of the build process is to add these video files your App's resources.
For information on how to add video to your App, go to How to Add a Video File.Step 23 - Publish Your App (App Store).
To publish your App on the App Store, go to How to Publish Your App on the App Store.
Step 24 - Publish Your App (Play Store).
To publish your App on the Play Store, go to How to Publish Your App on the Play Store.
Step 25 - How to Sync New Content to Your Published App.
iCaddy Apps includes a great sync feature that lets you easily update new images or text in your App, without having to re-publish through the App Store and/or Google Play.
Note that the App Store Multimedia details and the Store Properties for the App cannot be updated via this method. In order to change these details, you must re-publish a new version of your App.
For information on how to sync new content to your App, go to How to Sync New Content to Your App.


